


Learn how teaching by example can significantly boost training. Through an example, you will learn about a variety of design-patterns and explanations. Learn about the 6-step instruction formula to explain any subject while maximising training efficiency.
Imagine you have attended a course on Risk Analysis. The trainer starts the course by diving into theory of statistical risk calculation, throwing lots of math at you and expecting you to feel excited and interested. With all that math, it is highly likely you have zoned out few minutes into the course. Theory can be boring. Yes; it is essential to learning, but the need to learn something doesn’t make it any less boring.
Is there a way to avoid explaining something in a boring way? Numerous training courses fail simply because the trainer wants to show off his knowledge and impress the crowd or to simply cover ‘everything’ over the short time available to teach.
As a trainer, your job is to explain how something works. How best should you approach this? How can you avoid boredom? Should you start by explaining definitions and jargon and then move on to formal concepts? Should you dive into some case studies and examples? Should you just show an image and hope they get it? Should you tell a story to inspire your learners? Should you just let your delegates figure it on their own with minimal guidance from you? Should you make them feel the pain and see how hard it is to learn so they can appreciate it?
To answer these questions, let’s go back to fundamentals. When training adults, you must always take steps to make things easier and quicker to understand, you should constantly keep your delegates engaged and make sure they want to learn. There is also the intention to teach in a way to help them remember it for a long time to come.
It has been proven that teaching by example is a highly effective method. It doesn’t matter what it is you want to teach, examples work. Whether it is composing a story, making a product, using software, walking through a process, explaining a phenomenon, conducing a lab experiment or writing code, examples rein supreme.
“We learn by example and by direct experience because there are real limits to the adequacy of verbal instruction.”
Malcolm Gladwell
Before diving into exploring how to teach by example, lets clarify that there is no single technique you can use which works every time for any situation. You will need a set of teaching tools at your disposal which you can use to experiment in different situations and with different delegates.
Teaching is a skill. Aim to collect teaching tools and examples and practice applying them while measuring results; over time, you will develop an intuitive feel for what works and what doesn’t.
Not all explanations are good, and not all examples work. The simple measure is to see how quickly delegates get it, and how long they remember it for.
Let’s see how teaching by example can work in practice. To explain, and to stay true to premise of the article, a comprehensive example is provided to illustrate the point.
In what follows, you will see a series of design patterns through a case study that helps demonstrate how something can be explained in so different ways; some better than others. There are pros and cons for each explanation, though most importantly, your subjective preference matters too. Some explanations may appeal to you more than others simply because they match your learning style better. Bear this in mind when using a design patterns for your own examples.
A Basket of Explanations
The chosen topic for this series of explanations is h-index. Don’t look it up if you don’t know it. You will read about it shortly.
This topic was selected because it is not straight forward topic that you would come across on daily basis. If you don’t know what it is, you must be told about it since it has a precise definition and step-by-step procedure to calculate it.
If you already know about this topic, you can still benefit from this article because you can see how each explanation compares to what you already know. If you know about h-index, think how you would explain it to someone who doesn’t know before reading any further. Write this down and compare your explanation with all that follows. You will learn a lot from this exercise.
As you go through the explanations, ask yourself what you think of each explanation. Did the explanation work? Did you get it? How fast did you get it? Did you like the way it was explained? Did it match your learning style? What was good about it? What was bad about? Does this explanation help you remember it for a long time to come?
The explanations below provided for h-index are taken from the net as various authors have tried to explain the concept in their own styles. Hence, these explanations are not made up; these are how experts and people who know about h-index have tried to explain them. The aim is not to indicate who is good or bad at explaining. The aim is to learn from a variety of styles and see the strengths and weaknesses of each style for training purposes.
H-index is also known as Hirsch index or Hirsch number. The index was suggested by Jorge E. Hirsch, a physicist, in 2005 as a tool to measure a physicist’s relative quality. It is now widely used in the scientific community.
Let’s get started.
Explanation No 1:
“The h-index is defined as the maximum value of h such that the given author/journal has published h papers that have each been cited at least h times.”
Explanation No 2:
“If f is the function that corresponds to the number of citations for each publication, we compute the h index as follows. If we have the function f ordered in decreasing order from the largest value to the lowest one, we can compute the h index as follows:”

Explanation No 3:
“A scientist has index h if h of [his/her] Np papers have at least h citations each, and the other (Np - h) papers have at most h citations each.”
Explanation No 4:
“H-Index = number of papers (h) with a citation number = h.”
Explanation No 5:
“The h-index is calculated by counting the number of publications for which an author has been cited by other authors at least that same number of times. For instance, an h-index of 17 means that the scientist has published at least 17 papers that have each been cited at least 17 times. If the scientist’s 18th most cited publication was cited only 10 times, the h-index would remain at 17. If the scientist's 18th most cited publication was cited 18 or more times, the h-index would rise to 18.”
Explanation No 6:
“Conceptually, the h-index is pretty simple. You just plot papers versus the number of citations you (or someone else) have received, and the h-index is the number of papers at which the 45-degree line (citations=papers) intercepts the curve, as shown in the diagram below. That is, h equals the number of papers that have received at least h citations.”

Explanation No. 7:
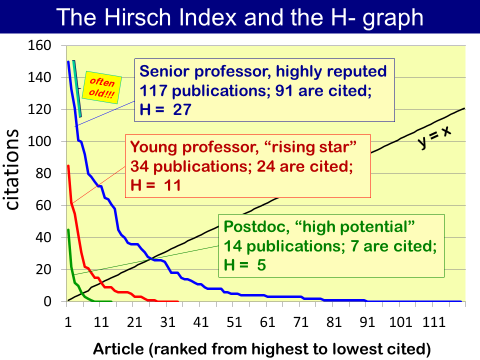
“The way to determine someone’s H-index is to rank his publications in decreasing order of citations and see at which number in the list the number of citations is less, as graphically illustrated in the figure. To illustrate why the H-index is a ‘quick and dirty’ parameter, one simply should note that an h-index of 10 implies that the author will have at least 100 citations in total. Suppose he published 10 articles more without any citations, he will have an average of 5 citations per paper. Perhaps his colleague from the same lab also has H=10 on the basis of 20 articles, but with a total of 500 citations, due to a few well cited papers he published together with a highly successful professor from a befriended laboratory.”
Figure: See this image here
Explanation No. 8:
“If a researcher has 15 papers, each of which has at least 15 citations, their h-index is 15. In the below example, an author has 8 papers that have been cited 33, 30, 20, 15, 7, 6, 5 and 4 times. This tells us that the author’s h-index is 6.”

What Explanation Was Most Useful to You?
How clear was each statement? Did you feel you needed a bit more help? In particular, did you think you needed an example?
The earlier explanations in the set are more formal and theoretical. Most people who go through these crave an example. They are like, “Yes, I think I get it, but can you please give me an example.” The later explanations are more example driven and as such are much easier to follow and understand.
Let’s examine them one by one:
Explanation 1:
This is the exact formal definition of h-index but unfortunately not the easiest to grasp straight away. You feel you need an example straight away.
Explanation 2:
This is the formal mathematical formula to calculate h-index. It is rather precise and is the most accurate representation of the concept. It is also the least interesting explanation to start with. People who are not familiar with mathematical notations will miss the meaning. Those who are familiar but are a bit rusty, don’t want to appear they didn’t get it so they will shake their heads, while thinking hard in the background.
This is a useful explanation for someone who needs to know how to formally calculate h-index, say a programmer who is writing software for it. But it is not a good general explanation.
Explanation 3:
This is another formal definition which is more concerned with being precise and accurate rather than being clear. You don’t really need “[his/her]” in the middle of a simple sentence defining a mathematical definition. You also don’t need to say “Np”. It doesn’t really add a lot of value, but can certainly raise questions on what is N and what is p and why not just N.
Explanation 4:
This is a beautifully concise description of h-index and certainly better than Explanation 3, even though it is still as precise. However, it still lacks an example.
Explanation 5:
Here, the explanation has done away with anything formal. It is aiming to explain the concept in simple English, without mixing it up with math (mentioning “h”, “Np”, etc.). This is then followed by the simplest example possible to state what h-index of 17 means. To address any potential questions that may now pop up in the reader’s head, this is then followed by two variations on how h-index can change. By the end of this explanation most people would get the concept quite clearly.
Explanation 6:
This is a visual representation of h-index. It is mathematically precise. The image provided acts both as an example and a way to accurately calculate the h-index. The 45-degree line also feels novel and intriguing, so it grabs attention. Being visual and novel, makes it memorable which is a key parameter in teaching.
Explanation 7:
This explanation is accurate from a formal point of view, has several examples followed by an illustration. You would think, therefore, that this must be a comprehensive explanation. Yes and no! It is certainly comprehensive and in fact it provides an insight into h-index’s potential weaknesses. However, as a first explanation it is too much. If you placed this diagram in a slide and this was the first slide you showed to explain h-index, you can be sure that most people will be confused. If they have enough time to parse through it, they will eventually get it, but in a classroom, you don’t want to throw everything at them in one go. This explanation can overwhelm the working memory while people are trying to figure out what is what, what you are referring to and where to look at while you explain. It can easily lead to death by Power Point!
On the other hand, if you have already covered h-index and now want to move on to its applications, strengths and weaknesses, then showing this graph is ideal. It includes many examples. Delegates will know how to parse it and understand the extra curves shown. These examples further help to illustrate how h-index works in the real-world.
Explanation 8:
In this explanation, h-index is described purely with an example. Data is provided in a table which acts as an illustration. It is exact and concise. It is also easy to explain what would happen if the author wrote another paper and how the h-index can change.
What Can We Conclude?
The exercise above illustrates several critical points:
Examples greatly facilitate the process of explaining something.
- A formal definition is useful when it comes to knowing something precisely, but an example is faster and easier in communicating a concept.
An image is worth a thousand words.
- Consider illustrations as compressed information that you make available quickly and are universally understood. Visual processing is our most powerful sense by a large margin. Take advantage of this and don’t rely on pure text or speech. Complement your explanation with an image or illustration. Even a table, as you saw above, can greatly help to visualise an idea.
A collection of explanations is better than one.
- There is no doubt, that having gone through several different definitions above, has helped you understand the h-index better. Each explanation is somewhat unique and adds value. Each example illustrates the concept from a new angle. The collection helps with long term learning. The downside is that giving more explanations takes time and at some point it can start to overwhelm delegates and becomes detrimental to learning.
Don’t just focus on a single explanation that feels natural to you.
- Rather than choosing an explanation that appeals to you, aim to provide several of them. An explanation might appeal to you because of your specific learning style but your delegates might respond to another explanation better and so offering several explanations can boost training for all. You don’t need to guess what their learning styles are. Just focus on providing several explanations that appeal to different learning styles and you can hope to cover all needs.
Don’t give too much information in one go.
- Give information in chunks. An extremely complex and detailed diagram can work against you when a learner doesn’t know what to focus on. It can create more confusion rather than providing clarity.
Just giving an example may not be enough.
- Although examples help, but a structured explanation quickly distils the idea for a learner.
It is always useful to give examples, though examples are not all equal. Some examples are better than others. Some examples can confuse and hinder learning rather than facilitate it. Choose wisely.
Collect Design Patterns that Facilitate Training
Having gone through the above series of explanations, you can see that the style of explanation can be used to explain a similar concept. If you come across a pattern that is successful, make a note of it. Record it somewhere systematically. For example, explanation number eight from above with a table can be turned into a design pattern that you can use in the future.
Refer to these design patterns every time you want to explain a new topic. See if your previous design pattern can be used for this. Within a single field it is more likely that you can put the design pattern to good use.
Show rather than tell.
Theory can be boring; examples are exciting.
Why Giving Examples Can Significantly Boost Training
A good example can be a model; something that students can aim for. Educational modelling is defined as giving students an example of a process or product that they can imitate to develop their skills and understanding of the process. Hence, an educational model is more than just a visual representation; it is a training aid.
Models can help delegates see the relevance of the task.
Recall that adults commit to learning only when they know why they need to learn. Commitment boosts engagement, reduces resistance and accelerates learning. By providing real-world examples, models help delegates see why they need to engage in the activity.
Models help students see what they are supposed to produce.
Examples:
- “Here is how this effect can be done in PhotoShop. Now you do it.”
- “Here is an example of what you should write. Now write something like this example.”
- “Here is a clay model of the object you need to create. Now make something like this.”
Instructions combined with a model help delegates see what the final ‘product’ can look like. Remember, you are not expecting them to replicate it; they need to deconstruct the example, understand it, match the example with your formal instructions and then create an example of their own. The process will significantly help with long term learning.
Models help with quick and systematic progress.
A model helps delegates to assess their progress. It frees you up from constantly giving feedback on performance or results. If you were to give only instructions, you will need to check their every single step to make sure they got it right. The delegates have no idea how to measure performance, so they rely on your feedback instead.
A model also helps with comparison and performance measurement. It makes communication easy. You can go over key concepts while comparing their version with the model and in most cases, they can see for themselves what might be lacking.
Models can be used to teach any skill.
Example-driven teaching is one strategy that you can never go wrong with and is applicable to tall topics.
Where to Get Examples and Models
You will need to obtain your example from the following sources:
Use professional examples.
- Established text books are a great source for professionally made examples by other subject-matter-experts. They have been tried and tested. Similarly, videos, online learning products and professionally produced training materials can help to inspire you of what examples to use.
Design your own.
- The advantage of designing your own example is that you can fine tune it for a given training task. However, you might need to refine it over time in order to end up with a powerful example. Make sure to measure learning performance and always ask yourself how you can come up with a better one.
Use student examples.
- Collect examples from former delegates. Current delegates might also come up with ingenious examples that you can share with the class. Always ask for permission before you share anything. Never use a delegate’s work as a bad example.
How to Present Examples
Examples are great but usually on their own they are not enough. There comes a point where giving direct instructions can greatly add value. Let’s explore this a bit more. You can give instructions and you can give examples. In what order should you give them. Here are several possibilities:
Give instructions only
Here, you are telling rather than showing. It’s more likely that your coverage of theory turns boring quickly. This is not as good as giving examples.
Give examples only
This is a great improvement over instructions-only method but can lack structure. Let’s say you give examples of sentences written in English. On their own it might prove difficult to understand and parse the underlying grammar rules. It might be much easier if you also explain the grammar since learning from examples alone can take much longer. A learner many need to go though many examples before being able to figure out a pattern and the task would be much like carrying out research on original science. It will be slow.
Give instructions, then examples
By providing both instructions and examples, you cover more ground. However, long instructions are often boring. Learners may disengage not knowing where you are heading. They may tune out during instructions and only listen to examples in which case it could be a waste of time giving instructions.
The only exception is that if instructions are simple to understand and easy to communicate, then starting with a short instruction is quite powerful. Explanation number five is a great example of this approach which works brilliantly in explaining h-index.
Give examples, then instructions
If instructions are detailed, complex and potentially boring, consider covering an example first. This way you keep delegates engaged and show them how they can benefit from what you are about to teach, familiarise them with an example product or show them how something is done.
However, you need to be very careful with how you present your example. Remember, your learners are not familiar with the topic yet. If you start with a complex example, delegates would feel confused and overwhelmed.
Most adults don’t automatically assume they are not capable of learning (ego gets in the way); instead they assume that they don’t have much interest in it, at least not at the level you are teaching. The result is that they will tune out.
Getting better. We are nearly there. Let’s improve this method even more.
Give an introductory example, then instructions, then a detailed example
You can choose an introductory example designed to engage the delegates and to quickly demonstrate the value of a concept without overwhelming them. You can choose a simple example that is easy to grasp, and yet powerful and engaging. You can then follow this with specific formal instructions. Next, give a detailed example. This step helps you cover an example that is more realistic based on real-world applications so delegates can see how it benefits them.
The 6-Step Instruction Formula
This combination leads to an ideal formula for teaching any subject:
- Give an introductory example. Keep it focused and engaging. The aim is to keep learners interested and listening. This could be as simple as showing an illustration, a final product, a dance move or a numerical example.
- Give instructions. Cover theory, definitions, jargon, conventions and procedures. Keep the instructions simple so it is easily communicated and understood.
- Give detailed examples. Now go over several examples one after another covering different aspects of the topic. Provide bad examples as well as good ones. Use tools and props to engage as many senses as possible. Make delegates see for themselves what is useful and what needs to be avoided.
- Get them to discuss examples. Surround examples with lots of discussions. Encourage delegates to be analytical. A common mistake is to share a seemingly simple-looking example briefly and leave it at that. Delegates may believe they got it when in reality they haven’t. It is the deconstruction and analysis of examples that leads to learning. Discussions automatically lead to such scrutiny.
- Get them practice by imitating an example. Let delegates have a go and see what they can achieve. Let them fail (in fact encourage it), which is not really failure but understating what works and what doesn’t. It is through understanding the limits that people learn.
- Measure performance and provide feedback. Let delegates know if they are on the right track and how they can improve their performance. Always praise achievements. Surprise them by giving rewards, not by making them expect to get a reward for effort or achievement. This helps you focus on developing their intrinsic motivation which is much more powerful than external rewards.
Why Giving Examples Is Not as Popular as It Should Be?
If examples are so good, why doesn’t everyone use them? One reason is habit. Formal instructions seem to be the fastest and most common way of explaining something.
Another reason is that it is easier to just jump in and give instructions. It’s kind of good for the ego too. Who doesn’t want to get into a teaching position to show off some knowledge straight away?
Let’s say a colleague of yours has heard of something called SWOT but doesn’t know what it is and wants to learn about it. You know about the SWOT analysis and it is natural to just jump in and say, “Oh, it’s a great tool. Here is how you do SWOT analysis: You have four quadrants and each letter is placed in a different quadrant like this and S stands for Strength and W stands for Weakness and…”
You continue like this while your colleague is trying hard to figure out where all this is going and what a SWOT analysis is for. It is just easy to dive in to give instructions. What is harder is to have a good prepared example to show what SWOT is about and why it is used and how your colleague can benefit from it. If your colleague is not convinced about the tool, he is likely to zone out, cut you short or simply declare that this tool is not for her.
You don’t need to show a complex example or diagram at this point. Just something that shows the essence of the tool, so your colleague can quickly see what it is about and how it is implemented.
Is There Anything Bad About Using Examples?
A fair criticism of using examples the wrong way is that it can reduce opportunities for creativity. By giving an example, you are, by definition, guiding delegates in a specific direction. In the process, other possibilities might be neglected.
This is another reason why teaching purely by example is not ideal. If you combine examples and instructions, as you saw earlier, you can benefit from the boost in training that an example provides. At the same time, you will be allowing a certain level of creativity based on your instructions, and the subsequent exploration of a given topic.
We want to avoid cookie-cutter work or copycatting an example. Instead, we want to encourage the learner to get inspired by the example and then work on their own example to express themselves.
Since this is an article advocating examples, let’s present an example to illustrate. Consider teaching oil painting in art. You can present a work of a master to illustrate how a particular effect, brushwork or composition is carried out. The example can greatly help to show what can be achieved. The student, however, is not expected to copy the work or present something exactly like it. Instead, students must deconstruct the painting, see how the artist approached a problem and understand what solution was used to tackle it. To control the focal point, the artist might have used some strong colour contrasts. An edge of a wall might have been eliminated or defused in the background to cancel out a distracting tangent line. The character might be holding a staff in a certain way to help direct the gaze of a viewer around the painting. Once students understand these problems and solutions through examples, they can use similar approaches in their own paintings.
Creating Good Examples Is an Art
Just like art, coming up with good examples is a combination of design and craftsmanship. You will need to know your subject matter, teaching tools, design patterns, training methods, students’ learning styles and training needs. Armed with this information you can then come up with applicable examples that boost learning.
Over time, you also learn which examples work for your specific audience and which ones do not. The craftsmanship comes through repetition, observation and a constant attempt to increase the efficiency of training, i.e., transferring long lasting skills quickly.
Helpfully, before long, you will have a good collection of examples and can engage in the joyful exercise of delivering example-driven training.

About the Author
Dr Ethan Honary is the founder of Skills Converged Ltd. A training consultant, researcher, author and designer with an aim to help trainers worldwide to improve training delivery and course design.
Table of Contents
What Explanation Was Most Useful to You?
Collect Design Patterns that Facilitate Training
Why Giving Examples Can Significantly Boost Training
Where to Get Examples and Models
The 6-Step Instruction Formula
Why Giving Examples Is Not as Popular as It Should Be?
Is There Anything Bad About Using Examples?
Creating Good Examples Is an Art

Course Design Strategy
Available as paperback and ebook

Online Train the Trainer Course:
Core Skills
Learn How to Become the Best Trainer in Your Field

Train The Trainer Book
Available as paperback and ebook
The Most Similar Exercises & Articles to this in Order of Similarity Are:


Explore Topics
Longform Train the Trainer Guides
All In-Depth Articles
CPD Accredited
Online Train the Trainer Course: Core Skills
Learn How to Become the Best Trainer in Your Field
Full Course Details

How to Reference This Article
Honary, E. (2019) "Teaching by Example Is Highly Effective in Training", Skills Converged. Retrieved from: https://www.skillsconverged.com/blogs/train-the-trainer/teaching-by-example-is-highly-effective-in-training
Leave a comment
All comments are moderated before being published.
This site is protected by reCAPTCHA and the Google Privacy Policy and Terms of Service apply.